Top
HOME   BOOKS

How to take better pictures with any camera.
Page 2
Photo Tips, by John Bower

These tips will help you compose a better image while looking through the viewfinder. There are no complicated technical issues, so if you're a beginner, please don't be frightened off. Most of these Tips are not new. I learned them from other people, and from reading photography books. But they were new to me when I first learned them, so they may be new to you as well. I like to shoot in black-and-white, so my examples tend to be black-and-white, but these tips apply to color as well.

Additional Photo Tips

[Page 1] [Page 2]

Photo Tip #13 USE YOUR LIBRARY.

By this I mean you should look through photography books to get ideas, and many libraries have a good selection. There are thousands of photography books out there, and most of them will give you some great ideas. In the how-to books, perhaps you’ll pick up a particular technique or way of pointing your camera, or a way to frame an image. Other books on individual photographers could stimulate you to take pictures of things you may not have otherwise thought worthwhile. For example, a photographer named Arthur Fellig (1899-1968), who called himself Weegee, liked to take

pictures of crime scenes. If that’s your interest, you’ll want to check out his books. If you like Western landscapes, look into Ansel Adams' books. There are also great books by (and for) portraitists, news photographers, or animal lovers. And, consider looking at the same books after several monts, or a year, and I’ll bet you pick up some ideas you missed earlier. Of course, if you like abandoned Indiana buildings, you’ll want to check out my books. They’ll all give you plenty of ideas for new things to shoot.

Photo Tip #14 USE BOTH THE FOREGROUND AND THE BACKGROUND.

This is what you do if you have two subjects, one up close, and one in the distance. Usually one of your subjects will be more important, or lend itself to being in the foreground (or background), but they will compliment each other. For example, the next time you’re in Paris and you want to photograph your friend in front of the Eiffel Tower, move far enough away so you can see the entire Tower in your viewfinder, then have your friend stand fairly close to the camera so you can see them easily with the Tower in the background. This can be difficult to do with an auto focus camera because the camera may want to focus on your friend, and leave the tower out-of-focus. But if you have an adjustable camera, you can often get a great image by using a smaller aperture for a lot of depth-of-field. If I’m shooting, for example, an old abandoned building, I’ll often walk around until I can have an old piece of equipment, or a large rock, or mailbox, or something, in the foreground to give the image some extra interest.

item4a

Barn and mailbox, Bartholomew Co.178.08, from Lingering Spirit

item5

Gary City Methodist Church, Lake Co. 685.12, from The Common Good

Photo Tip #15 BE INSPIRED.

Don’t be afraid to copy the photographs of others. Some people consider this to be plagiarism, but it’s nearly impossible to copy someone’s style perfectly. For example, you could go to the exact same spot where a famous picture was taken, and be there on the same day of the year, with the same model camera. And you’d still not be able to duplicate that famous picture because the trees would have grown, the clouds would be different, or a building might have been remodeled. But you can learn a lot by copying the work of others and, after a while, your own unique style will emerge. I do this regularly, by imitating the way a particularly appealing image was shot. In the two images at the right, you can see how my shot of the grist mill at Spring Mill State Park was influenced by the cover of the very first LIFE magazine. If you like my photographs, I’d be honored if you want to try to copy the images themselves, or my style.

item4

Grist Mill, Spring Mill State park, Lawrence Co.78.07, from After the Harvest

MBWhite

First LIFE magazine cover, image of Fort Peck Dam by Margaret Bourke-White

Photo Tip #16 HAVE YOUR SUBJECT DOING SOMETHING

When I look at old historic photographs of people, they’re often pretty dull. Part of this is due to the fact that shutter speeds were very long back then, and the subject had to sit still for quite some time to properly expose the image. But, even after film speeds improved, there are loads of pictures of people standing or sitting, very still, looking straight at the camera. If the subject had been doing something, it would have made the image much more interesting. I wish I had some pictures of my grandmother in the kitchen rolling out pie dough, or my grandfather fishing, because that’s how remember them in my mind. So, take pictures of your friends and family when they’re actively doing something. It could be mowing the lawn, raking leaves, setting the kitchen table, reading a book, typing on a computer, applying makeup, driving a car, filling it with gas. But you don’t want them to look posed, so just tell them to go ahead and keep doing what the were doing when you walked up with your camera. We are all always doing things, and it’s often the simple everyday things that can make an image interesting.

img105

Lynn feeding ducks in winter.

img110

Lynn playing her recorder.

Photo Tip #17 READ ABOUT PHOTOGRAPHERS.

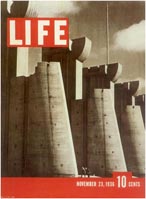
You can learn a great deal about photography, techniques for taking pictures, and the mindset of how to take a good picture, by reading about the lives of photographers, and it can be either autobiography or biography. It’s an interesting fact that creative people are often creative in more than one area. In fact, there are a number of great photographers who are also accomplished writers. Margaret Bourke-White, who got one of her images on the first cover of Life magazine (see Photo Tip #15),wrote a very good autobiography, Portrait of Myself. Debora Copaken Kogan wrote a memoir about love and war, from a photojournalist’s point of view, in Shutterbabe. One of the most prolific and all-round artists is Gordon Parks. A premiere photographer, Parks also directed the move Shaft, composed music, and authored nearly 2 dozen books. My favorite is A Choice of Weapons.

Good biographies include Mapplethorpe by Patricia Morrisroe, Diane Arbus by Patricia Bosworth, and Edward Weston: His Life by Ben Maddow. Wright Morris is best known as a writer, but I have a really nice collection of his photographs in a book titled Distinctly American. Eudora Welty, another writer, also has published some great photograph books, of which I particularly like Country Churchyards. There are also some fine books containing biographical material about several photographers, such as Life Photographers: What they Saw by John Loengard, and Seeing America: Women Photographers Between the Wars, by Melissa A. McEuen.

Photo Tip #18 LOOK FOR SHADOWS.

Most people take pictures with the sun behind them, because that’s what we’ve often been taught. The subject will be evenly illuminated, and that may very well be the effect you’re after, but it can also be less than interesting. If you change your position in relation to your subject, so the sun is off to the side, you’ll notice more shadows. If want to shoot your friend, and you position them, and yourself, so you see both shadows and illuminated parts of their face, you can get a much more dramatic image. It can be tricky to get the light and dark areas to look good together, so you may need have to move back and forth a bit, and have your subject turn back and forth until they look the best. When I’m photographing cemetery statues, they won’t move for me, so Lynn often uses a reflector to bounce the sun onto one side of the statue. I’ll be looking through he viewfinder while she moves back and forth until I think the light/ shadow combination looks just right. That’s when I ask her to hold her position, and I snap the shutter. Shadows can also enhance many other types of images, if you just train yourself to look for them.

item6

Cemetery statue, Greene Co.309.07, from Guardians of the Soul

item8

Monastery Immaculate Conception, Dubois Co. 553.10, from 2nd Stories

Photo Tip #19 SHOOT DURING THE GOLDEN HOUR.

In my last Photo Tip, I talked about using shadows. For a minimum of shadows, you should try shooting during the Golden Hour (sometimes called the Magic Hour) which is the first and last hour of during the day. This pertains more to color photography, than black-and-white, because during those hours, the sun lights up the whole sky, and there will be softer colors. At noon on a sunny day the colors will be much brighter, and the shadows can be harsh. This first and last light is actually significantly different, and it can be really nice for scenes of the ocean, countryside or city.

Early in the morning, and late in the day, the sun is near the horizon, so the sunlight travels through more of the atmosphere, which reduces the intensity of the direct light, so the illumination is more indirect. The early and late light will typically be softer and warmer (more red), and if there are any shadows, they will be soft and long. This is also a really great time for shooting portraits.

Photo Tip #20 SHOOT UNDER DIFFERENT WEATHER CONDITIONS

Most people take their outdoor pictures when the weather’s nice. But you can also get some great shots when it’s lousy out. Go out and do some shooting in the winter, when everything is covered with snow or ice. When it’s really overcast, looking like rain, you’ll get images with muted colors. Complicated subjects (like a collapsing abandoned house) can look cluttered when there are a lot of shadows, so you may want to shoot them when the sun’s not out, or when it’s temporarily behind a cloud. I’ll often wait a few minutes for the clouds to either move in front of the sun, or away from it, depending on the effect I want. If you can keep your camera dry, under an umbrella, you can even shoot when it’s raining or snowing to get a different kind of effect. And if you don’t mind getting up early, think about shooting on a foggy morning. The fog can make for an eerie picture, particularly of a cemetery, or an abandoned house.

item9

Old Inn, Bartholomew Co. 150.14, from Lingering Spirit

item10

House, Bartholomew Co. 162.04, from Lingering Spirit

Photo Tip #21 EXAMINE THE ENTIRE IMAGE.

How-to photography books often have the classic example of a photograph of a person, perfectly illuminated and smiling, but they are standing in front of a billboard that features a vase of flowers, and the flowers seem to be sprouting from the top of the person’s head. Obviously, the photographer was concentrating on the subject, and didn’t pay any attention to the background. So, you need to look at the background, before snapping the shutter. As I looked through the viewfinder at the three abandoned stores at the right, I spotted a brand-new stop sign that just didn’t fit in the image. So, I moved a little and reframed my shot so it wouldn’t show as much. What you need to do is train yourself to examine the entire image before you click the shutter. Look at the edges, the foreground, the background, as well as the subject. I often reframe an image to eliminate a power pole, a parked car, or something else that would otherwise detract. If there are clouds, like the cemetery statue (far right) position yourself so they look good with your subject.

item11

Old Leavenworth, Crawford Co. 167.13, from Lingering Spirit

item12

Cemetery statue, Spencer Co. 444.11, from Guardians of the Soul

Photo Tip #22 CHOOSE THE DECISIVE MOMENT.

The French photographer, Henri Cartier-Bresson (1908-2004), coined the phrase “The Decisive Moment.” By it, he meant that you should wait until the best instant to actually snap the shutter. This applies particularly to moving subjects. One of Cartier-Bresson’s most famous images is of a man trying to jump across a puddle of water (right), in which the shutter was snapped just when the man’s heel was about to make contact with the water. Let’s say you’re shooting a scene in which there is automobile traffic, or pedestrians walking in the background. You should look around and anticipate when the moving people or objects will form the best composition, then wait for that instant to snap the shutter. Or, if you’re sitting across from the pits at the Indy 500, and you want to capture some action shots, you should think, ahead of time, about what precise shot you want, then wait for it. For example, do you want an image of the car pulling into the pit with the crew looking over the wall, or a shot with the crew in mid-air jumping over the wall, or the crew tossing tires aside, or the driver smoking his tires on his way out of the pit. This all takes place in just a few seconds, so plan what you want ahead of time, then wait for that decisive moment.

Henri

Behind the Gare St. Lazare, Paris France by Henri Cartier-Bresson

img111a

Lynn jumping over Wea Creek, Tippecanoe Co.

Photo Tip #23 WATCH MOVIES.

There are some really great photographers who work behind movie cameras. So, check out movies that have won a “Best Cinematography” award, and pay attention to how they frame a scene, how they crop a person’s face. Think about where they were standing with their camera when a particularly striking scene was shot. Then use what you’ve learned in your still photography.

An oldie that’s still often studied for its camerawork is the black-and-white classic, Citizen Kane. And don’t forget foreign films. For landscape photography I really liked Dersu Uzala. When you study the work of good camera people, a bit of their talent will always rub off on you.

And the Oscar for Best Cinematography goes to:

1994 - Legends of the Fall
1995 - Braveheart
1996 - The English Patient
1997 - Titanic
1998 - Saving Private Ryan
1999 - American Beauty
2000 - Crouching Tiger, Hidden Dragon
2001 - The Lord of the Rings: The Fellowship of the Ring
2002 - Road to Perdition
2003 - Master and Commander: The Far Side of the World
2004 - The Aviator
2005 - Memoirs of a Geisha
2006 - El laberinto del fauno (Pan's Labyrinth)
2007 - There Will Be Blood
2008 - Slumdog Millionaire
2009 - Avitar
2010 - Inception
2011 - Hugo
2012 - Life of Pi
2013 - Gravity

Photo Tip #24 LOOK FOR PATTERNS AND TEXTURES.

A scene with particularly striking patterns or textures can add a great deal of interest to an image. For example, a person standing in front of a gnarled tree trunk can have a nice contrast between their smooth face, and the texture of the bark. Weathered wood (right) often has a very nice texture. And the texture of an older person’s wrinkled face can really bring out their experience and wisdom. A shot of a marching band, with their legs all in perfect alignment makes for a nice pattern. A cafe with all the outdoor tables and chairs perfectly aligned in a uniform pattern can be a good background, or a good image by itself if one chair is conspicuously out-of-place. In the shot at the far right, I liked the pattern of the 3 milling machines, with the light playing on them. By the way, the texture of an object will stand out more if the lighting comes from the side. This type of side lighting can enhance the appearance of textured and weathered wood on something like an old barn.

item14

Milburn School, Carroll Co. 981.02, from The Common Good

item13
Adams Mill, Carroll Co. 662.15, from The Common Good

Additional Photo Tips

[Page 1] [Page 2]